Custom Assignments
Custom Assignments allow you to add new assignment types that are not included by default in Meeting Schedule Assistant. This is useful when your congregation has additional duties that need to appear on schedules.
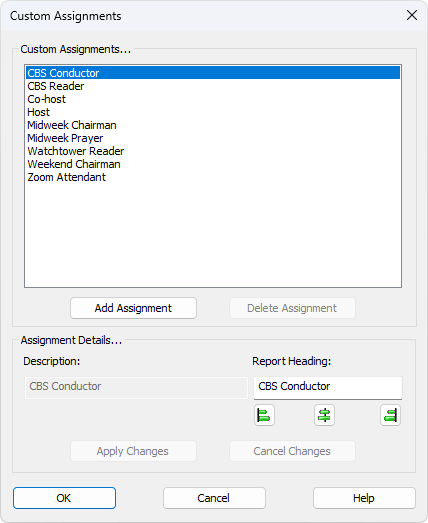
Figure 124. The Custom Assignments Manager window.
How to Access
You can access this feature from:
- Options — Custom Assignments
Using the Custom Assignments Manager
The Custom Assignments Manager displays all existing custom assignments in alphabetical order at the top of the window. Selecting one populates the edit boxes with its current details. Modify the text as required and press Apply Changes to save your edits.
Each custom assignment includes:
- Description: the internal name of the duty
- Report Heading: the text that appears as a column heading in the Assignments Editor and on generated schedules
You can also choose the alignment of the assignment heading as it appears on the report.
Once a custom assignment has been added, it becomes available in the Assignments Editor, where it appears as a new column. You can then use the Publishers Database Manager to specify who can perform that duty.
Adding a New Assignment
Press Add Assignment to display the Custom Assignment dialog.
Briefly describe the duty in the Description box, and specify how the column heading should appear in the Assignments Editor and on reports using the Report Heading box. Press OK to add the new assignment to the list.

Figure 125. The Custom Assignment dialog.
Changing Report Heading Alignment
You can change the alignment of the assignment’s column heading by pressing the appropriate button just under the heading.

Figure 126. Alignment buttons for the assignment’s report heading.
After adjusting alignment, press Apply Changes as previously described.
Saving Your Changes
Note: Make sure you dismiss the window by pressing OK to retain all your changes.
Navigation
- Parent topic: Options Menu
- Next topic: Settings