Using The Script Editor
If you have never used the script editor before, then this will help you get used to how to get around in the editor and begin writing scripts.
Please read this topic through completely before going on to the Tutorial 2 - How To Write Scripts. It is important you understand this basic functionality of managing custom reports and the script editor.
 This information is also held elsewhere in the help documentation, but has been collated together to assist with the writing tutorial.
Getting There
|
|
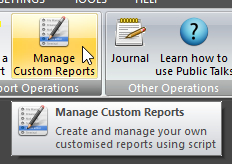
|
|
When the program is installed, several sample scripts are also installed as plain text files. As they stand, they are not usable directly by the editor. You must install them into the application. There are some specific reasons why this is not done automatically, but those reasons are beyond the scope of this tutorial. To get those scripts installed into the program, see Installing Sample Scripts Into the Program below.
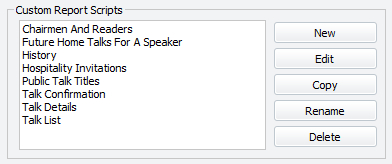
The Basics
When you start a new script, you will be asked for a name. There are some restrictions on what characters the name can contain, but you should be able to find a suitable name with ease. After that, or if you choose to modify an existing script, the rest of the features in script editor will become available.
What you see is what looks like a piece of paper with feint vertical grid lines, and down to the lower right, an empty box. The empty box is where the script commands will go, and the page is where that script will be rendered (drawn) so that you can see how it will come out on the report.
The final report will not have the grid lines, they are a guide which you will learn about in Tutorial 2 - How To Write Scripts.
The page on the left of the script editor window will take on the chosen printer settings; that is, it will be scaled according to whether you have chosen A4 or LETTER paper sizes, and will be orientated according to whether you have chosen portrait or landscape. These paper settings must be set by choosing Print Setup from main application menu before using the custom script editor. Note that while the page changes orientation and the guidelines widen, they are still vertical.
You will see that there are two new ribbon panels available. These are CONTENT and SYSTEM. The other is most likely minimised into the sidebar and is titled Required Variables. The ribbon panels is the place where all commands are inserted from. There are other ways to get script in the box, but this is your first and foremost place to do so and will help avoid mistakes in using the script commands. The variables window is where you will enter temporary values for variables your script requires so that you can check that your script acts on the data as you expect.
To insert a raw script command, you click the relevant button on the respective ribbon panel. In most cases a pop-up window will appear with options for you adjust as you desire. Then you usually click Insert (or Cancel).
To delete a script line, click on the line in the raw script pane on the right and press the Delete key (or use Delete from the menu that pops up if you right-click the selected line). Special rules apply for deleting a LOOP, but that will not be dealt with here. For the purposes Tutorial 2 - How To Write Scripts, do not click in the script box unless told to do so; otherwise you risk changing the insert point, getting lines out of sequence and getting the wrong results, which will only lead to confusion. As you progress through that tutorial it will gradually teach you how and why to change that insert point.
Editing a line of script is straightforward. Simply double-click a line (or use Edit line from the menu that pops up if you right-click the selected line), and it will appear in a pop-up window as if you had just selected the command from the ribbon panels. The Insert button has changed to Update, to replace the command with the new parameters. Again, don't try this unless told to. If you change your mind, clicking Cancel on the pop-up window will put the line back in the raw script exactly as it was.
If you click Cancel Changes or try to Close the script editor itself, and if you have made any changes to the script from when it was started / loaded, then you will be asked if you want to abandon changes. If you say Yes, the script will revert back to what it was when loaded. If this was a new script you started, it will not be saved, and will not be inserted into the list on the Custom Reports management window. If you say No, the editor will not be closed and you can click Save Script instead. Clicking Save Script automatically saves the updated script. Now you can click Close Script. If this was a new script, its name is inserted into the list on the Custom Reports management window. These scripts are saved as .CRS files in the Scripts subdirectory below where you installed the program.
If, at any time during the Tutorial 2 - How To Write Scripts tutorial, you make a mistake, the easiest way to get out of it is to abandon changes to your script (Cancel the editor window and select Yes when asked to abandon) and start a new script (or edit the existing one if you had some of it saved).
Installing Sample Scripts Into the Program
The easiest way to get a sample script into the editor is to right-click inside the raw script pane on the right and select Import Text from the pop-up menu. Now you can select the script you want to insert. The file window defaults to the location of the installed sample scripts but you could navigate to any folder.
There is another way to get script into the raw script pane in the editor, as we mentioned above. It supports fully standard Copy, Cut and Paste clipboard commands just like your favourite text / document editor, and the results are stored in plain text if you copy or cut from the script. Note that the same special rules apply to trying to Cut a LOOP command as for Delete. Similarly, if you have plain text from another editor, you can Paste it into the raw script box and the parser will try to interpret it as script.
If you look at the menu that appears when you right-click in the raw script pane, you will also see Reformat script. By choosing this, a very simple indentation scheme will be used to make commands inside loops clearer.
Date Filtering
The script parser has some fairly good filtering mechanisms in its commands that allow you to narrow down the set of data returned. One of the most common types of filtering you will want to do is to limit the report to a specific range of dates. Although you could do this within the script, we have provided a much simpler mechanism for this since it is so commonplace. On the right of the Custom Reports Management window you will see two date controls and a checkbox saying All Entries. By default, this checkbox is switched on. This means that any loops you write will use the full date range supported by your database - that is, records returned in a loop will be from any date that exists.
If, for example, you wanted to only list data from October of last year, then you would want to limit the filter accordingly. To do this, switch off All Entries, and the date controls will become enabled. You can now select the start and end dates (inclusive) to use when looping the database. The easiest way to change these controls is to click the arrow, and a familiar calendar window will pop up to allow you to select the exact date. Alternatively, you can directly click in the control on one of the three parts (month, date, year) with the mouse, and use the up / down arrows on your keyboard to roll through the possible values. Note that the up arrow increases the value and the down arrow decreases it. You may find this odd to start with, but it is perfectly logical when you think that the higher arrow gives a higher value.
Scale View
By now you have probably started a new script in the editor window and seen the page preview. Note that when you do, by default there should be no scroll bars (unless you opened a script that gave a lot of data, in which case there would be vertical bars) - specifically, no horizontal bar. This is because by default, the [page] view is scaled so that the width you get on the screen represents the full width of the page. What you will not see until you can get a long script is that at the bottom of that page is a broken line across, representing the page break - the full height of the page. This is known as scaled view and allows you to see the whole page at a glance. Of course, this means that the output is going to be slightly squashed as it tries to fit it all in. The smaller your screen resolution, the worse this squashed effect will be.
To see the output actual size, i.e., as close to the real size of text as it will print out as possible, you can switch off this scaling using the Scale View checkbox on the Custom Reports Management window. You can also make this change by choosing Scale View from the CONTENT ribbon panel within the script editor itself. Either way, a horizontal scroll bar will now be visible, since the physical page is larger than the window, and you can scroll across to see the rest of the width of the page.
Making Copies Of Scripts
Lastly, one of the controls on the Custom Reports Management window we have thus far not mentioned is Copy. When you click this, you must have an existing script selected. It will ask for a new name (same rules apply as for starting a new script), and if you OK that little window, then the script selected will be opened straight into the editor ready to make changes. Note that this is a copy of the script you selected - any changes you make now, if you save the changes, will be saved in a new script with the new name you gave it - it will not change the original script you selected.
If you click Cancel Changes and abandon changes, then it will be as if you never clicked Copy - the duplicate of the script will not be created, just as a new script is not created if you cancel.
|
If you have got this far and everything is making good sense to you then... what are you waiting for?! Go and read Tutorial 2 - How To Write Scripts! |