Module 11 - Move Over, Please
(Starts a new "MoreTextAttribs" script)
There are various reasons for not wanting your rendered output crammed up against the left or right margins all the time, or even all centred. Indentation looks nice, for one thing, and columns of data are also common. Anyone who has tried using spaces to achieve this has no doubt found just how many need to go in when using a variable-pitch font, since spaces are very small, and have also probably found that it isn't very reliable.
Most editors (including Microsoft Word) have tab support. You press the <Tab> key, and the cursor moves to the next tab stop, giving simple and effective alignment away from the margins. Our script editor also supports tabs; you just have to know how to get them to appear, since we don't edit the output directly like in Microsoft Word.
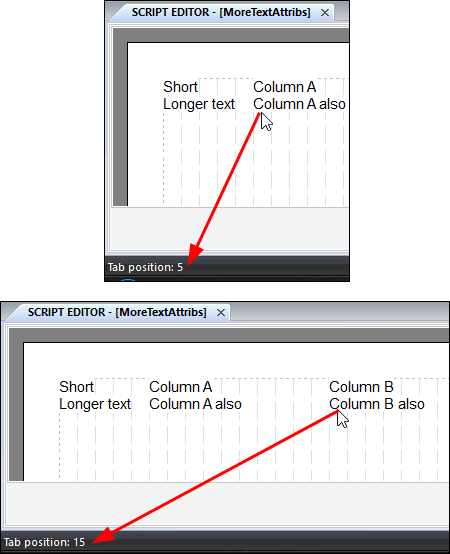
Those grid lines on the page? They are tab stop positions. Hover your mouse between two of those, and look down at the status bar. You should see an indication of that tab stop position.
 This number refers to the line to the left of your current position. If you are almost on a grid line with the mouse pointer, be careful you don't confuse which side it is talking about. It is always best to hover just to the right of a grid line to be sure.
 Let's do some column work ...
- Start a brand new script called "MoreTextAttribs" (no quotes).
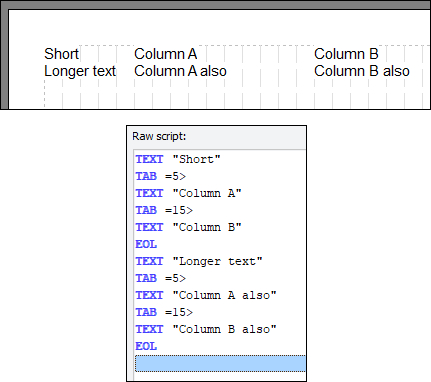
- Insert a TEXT command using "Short" (no quotes).
- Now click Insert Tab. Now either drag the slider to position 5 or just type in the number 5.
- Make sure the Position is set to Absolute.
- Leave the alignment set to Left (the default) for now, since this is the most common form of tab.
- Click Insert to put the TAB command into the script. Don't worry about how the parameter looks, we'll explain that later.
- Now insert a second TEXT command using "Column A" (no quotes).
- Now insert another TAB command, this time with a value of 15 (still absolute).
- Insert another TEXT command using "Column B" (no quotes).
- Insert the EOL.
Repeat all of the above TEXT and TAB commands, but using "Longer text", "Column A also" and "Column B also" as the pieces of text (all no quotes). Don't forget the EOL.
See how they line up, despite the change in text length at each column?
|
Hover your mouse just to its right below the rows of text, and satisfy yourself that it says Tab position 5 down in the status bar. Repeat for the line on the left edge of Column B (hovering just to its right), and confirm it says Tab position 15 in the status bar. Please note that I have stripped out most of the preview page on the images on the right. This is so that the images were not too large. What is happening here is that for absolute tabs, when you specify the tab number, it means to line up against that exact tab position. Hence, since we told it positions 5 and 15, those are the positions it lined up against. |
 We're now going to edit some commands for practice, rather than enter them all again.
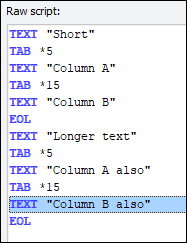
- Double-click on the fist line that says TAB =5>. It will appear in the pop-up Insert Tab window with all parameters set as you had them when you inserted it.
- Notice that the button that normally says Insert now says Update?
- Change the Position setting to Relative.
- Click Update.
The command should now still be in the same place in the raw script pane on the right, but should have changed to TAB *5.
- Repeat this with all other TAB commands in the script, and then observe the output.
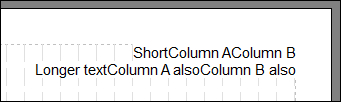
Notice how the columns are now not lined up properly, and in fact what it is doing is spacing each text chunk from its previous chunk by a certain amount. Thus, the longer text lengths on the second line means it spreads further along the line.

These are relative tabs. It means that the renderer moves along the number of tab stops you specify from the previous chunk before it writes the next chunk. That explains why the column B items are much further away, because we told it to move 15 tab stops from the last position instead of just 5 for column A items.
Think of it as you pressing the <Tab> key that many times to move across the page. Making sense? If not, don't panic. You probably won't have much use for relative tabs, so stick to absolute ones and you will be fine.
- Go back and edit all the tab commands to make them all absolute again.
- Confirm you have got your aligned columns back.
- Now, on to our final trick in this section.
 We are going to make our first insertion into the script. Move the highlight bar to the line that says TEXT "Short" - i.e., the very first line of this latest script we started.
- Insert an ALIGN command (Change Font).
- Select Right alignment.
- Now look at your output. Aaarrrggghhh!!! What happened? It looks like what happened when you tried to mix ALIGN commands on the same physical line, doesn't it? What's going on?
The answer is simple: tabs only work on lines that are left-aligned. For lines that are right- or centre-aligned, tabs have no effect and are effectively not even there. (For those of you keeping track (I was tempted to say 'keeping tabs' there) of what our script editor can do vs. Microsoft Word, you've got your first major difference - Microsoft Word can do tabs on right-aligned lines, we can't).
Think about it: you have told the text to line up on the left with tab position X, but you've also told it to line up with the right margin... what should it do with that conflicting information? Relative tabs might be different, but it's just not worth it: if you want to use tabs, keep line alignment to the left. Simple as that.
|
Now, please:
Then when you are ready continue with module 12. |