Overview
Meeting Schedule Assistant supports Our Christian Life and Ministry (OCLM) meeting scheduling, the easy way to create fully formatted, detailed, accurate, eye catching reports that can be printed and exported for the Notice Board and servant body of the congregation. Also you can create and print worksheets for the chairmen/auxiliary class counsellors and assignment slips for students.
Meeting Schedule Assistant especially is helpful with its dropdown lists of commonly used material such as various Themes and Methods used during OCLM Meeting program parts. Timing of assignments is calculated automatically, and song titles are generated automatically. Special events are easily catered for, such as during the circuit overseer visit or when there is an assembly/convention.
 The Meeting Editor has an automatic assignment feature (see: Auto Assign Menu) but this does not include Student assignments. However, it does have an assignment history facility which, if used properly, should assist you in making balanced selections for student items.
If you have suggestions to offer to make Meeting Schedule Assistant OCLM meeting schedules even better, please contact me.
How to use the editor
Step 1
Update the various settings related to OCLM scheduling from the Options menu.
- Select Options to customize your preference for meeting day and time. Adjust other settings according to your needs.
- Update the Publishers Database (if required). Within the Assignment field are entries for: Midweek Chairman, Midweek Prayer and Midweek Meeting. Add the names of brothers used for the OCLM meeting program parts. While there, you may determine the individual brothers Availability. You should also add names into the CBS Conductor and CBS Reader assignments too.
- Set any Special Events.
Step 2
Select the Date Range of the schedule to be created:
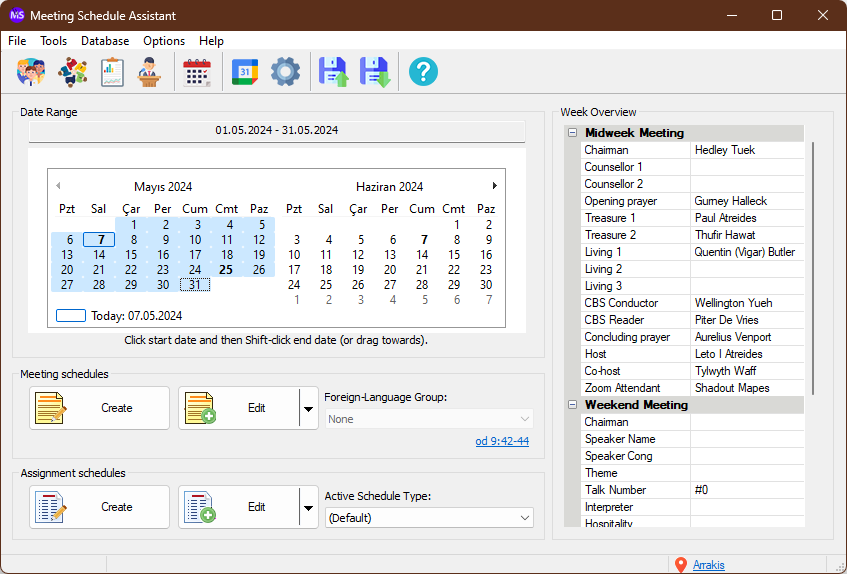
Use the left calendar to set the start date. You can click on any day within the first week required.
Similarly, use the right calendar to set the end date. Here you can also click on any day within the last week required.
You only need to set the date range when creating a new schedule.
Step 3
It is important that you set the Foreign-Language Group setting correctly. See the Using Meeting Schedule Assistant help topic for more details. In the vast majority of circumstances you should leave this set to the default setting of None.
Only change this setting if:
- Your congregation sponsors a Foreign-Language Group.
- You have assigned publishers to the Foreign-Language Group in the Publishers Publishers Database.
See the Foreign-Language Group mode help topic for full details.
Changing this setting will affect which publishers are displayed in the Meeting Editor and which history database is used. Also note that this setting is only respected when creating a new schedule.
Step 4
On the main window select:
Step 5
Please see the Meeting Editor help topic for full details about populating your schedules.
Step 6
Save the schedule (file type MWB — Meeting Work Book) to a folder of your choice, for access later.
Step 7
Print the schedule directly or paste the schedule into Microsoft Word for more editing.
Many users prefer save the schedule as PDF so it can be sent by email. See the support forum FAQ How can I export my schedule in PDF? to find out how to do this.
Exit
Press this button to close down the Meeting Editor and return to the main application window.
If you made changes to the schedule and did not save it, then you will be prompted to save your changes before closing the editor.
Hotkeys
|
Hotkey |
What it does |
|
ALT + SHIFT + S |
Performs a Quick Save. A quick save will only prompt to update the assignment history and does not sync with online calendars.
|
|
ALT + SHIFT + W |
Displays the working data folder in File Explorer and automatically selects the active schedule template file. Or you can select Open File Location from the context menu. |