Printing Personal Copies
Clicking the Personal Copies button will display a pop-up window for you to select several publishers from a list and it then creates a schedule for each individual, with their name highlighted for each of their assignments.

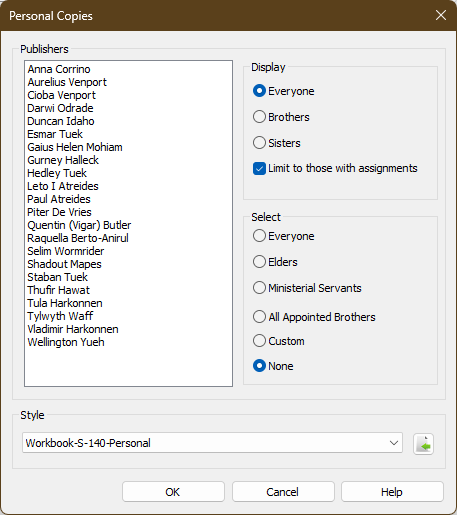
Select the publishers that you want to create a schedule for and then click OK. The schedule will be displayed in a pop-up window, maximized to your monitor. Right-click the schedule to print it.
 Learn more about the Personal Copies window by looking through the rest of this help topic. Or, as an alternative, click on the option you are interested in on the screenshot above.
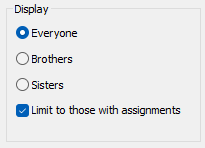
Display
Use these options to specify which publishers get displayed in the list.
|
Everyone |
This choice will display every publisher held in the database. |
|
Brothers |
This choice will display all the male publishers held in the database. |
|
Sisters |
This choice will display all the female publishers held in the database. |
|
Limit to those with assignments |
This setting works in addition to the above filtering options. When set, it will limit the publishers display to only those how have assignments on the active schedule. |
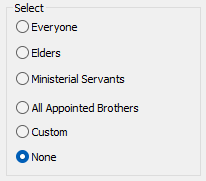
Select
Use these options to quickly select all publishers who meet the given criteria.
|
Everyone |
All publishers will be selected. It would be unusual that you would need to create a personal schedule for everyone on the list! |
|
Elders |
All the publishers who are appointed as Elders will be selected. |
|
Ministerial Servants |
All the publishers who are appointed as Ministerial Servants will be selected. |
|
All Appointed Brothers |
All the publishers who are appointed as Elders or Ministerial Servants will be selected. |
|
Custom |
This option is automatically selected whenever you manually select the publishers. |
|
None |
Clears the currently selected publishers. |
In addition, you can use the standard Windows keyboard shortcuts to individually select any publishers in the list. For example, press CTRL and then each name you want to select.
Style
Use the dropdown list to select the report style that you want to use.

There is currently only one report style that is installed with the application. It is based on the existing Workbook-S-140 style. The only difference is that the logic in the document has been adjusted to create a multiple set of schedules based on the publishers you have selected. Also, it has an associated style sheet document (CSS) file where the background highlight colour has been set to yellow.
Import Template
 Click this button to display a file selection window. You can then select CSS/XSL files and important them directly into the application. The file selection window is filtered to display the files with the right file names.
It is beyond the scope of this help topic to explain the fundamentals of writing bespoke XSL templates. Disclaimer: You import and use third party XSL/CSS files at your own risk.