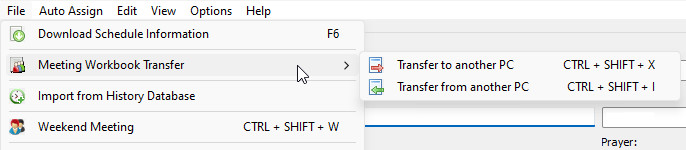
Meeting Workbook Transfer
The Meeting Workbook Transfer tools are available from the File menu.
The Life and Ministry Meeting Overseer is responsible for making the assignments for the Midweek Meeting. This also includes the Student assignments. But brothers (maybe the Coordinator of the Body of Elders) might have oversight for the Weekend Meeting and/or Audio-Visual Team. The Transfer tool has been designed to make transferring the relevant information between each other as simple as possible.
Publisher Database
The Transfer data file includes all essential publisher information and will automatically add or update the target database as required.
Congregations Database
The Transfer data file includes all essential congregation information and will automatically add or update the target database as required.
The target database is updated using the following rules (in order of priority):
- Merge Congregation if it does not exist in the target database.
- Merge Speaker if it does not exist in the target database.
- Otherwise replace all assigned talk outline numbers.
 The Meeting Workbook Transfer tools are disabled if you have a Referenced Schedule attached.
There are two modes:
Transfer to another PC

|
Weeks to include |
Select one or more weeks to include in the exported MWT transfer file. All weeks are selected by default. |
|
Assignments to include |
Select one or more types of assignments to include in the exported MWT transfer file. The Midweek and Students sections are selected by default. Thereafter it will remember the selected choices. |
|
Export |
Click this button to display a file window where you can specify the name and location of the exported MWT transfer file.
|
|
Cancel |
Click this button to abort the MWT transfer. |
Transfer from another PC
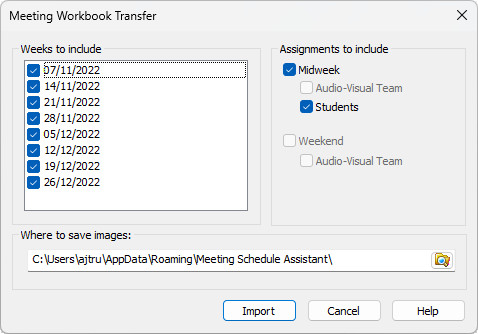
A file window is displayed for you to select the MWT transfer file to import. And then you will see the settings window for you to customize which data will be imported.
Don't forget to update assignment history after the transfer has completed. You can do this when you save the schedule.
|
Weeks to include |
Select one or more weeks to import from the selected MWT transfer file. All weeks are selected by default. |
|
Assignments to include |
Select one or more types of assignments to import from the selected MWT transfer file. You can only select from the sections that are stored in the MWT transfer. All available sections are selected by default. |
|
Where to save images |
Use the Browse icon on the right to select where to save any special event media. It defaults to the applications working data folder.
|
|
Import |
Click this button to import MWT transfer file into your active schedule.
|
|
Cancel |
Click this button to abort the MWT transfer. |