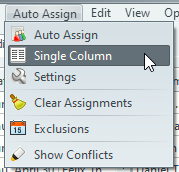
Single Column
This dialogue is displayed from within the Meeting Schedule Assistant Editor.
Select Single Column from the Auto Assign menu.

 Learn more about the Auto Assign Single Column window by looking through the rest of this help topic. Or, as an alternative, click on the item you are interested in on the screenshot above.
This facility allows you to populate one or more columns on your schedule with the minimum of fuss. This feature is very different from the regular Auto Assign facility because you have more control over how the schedule gets populated. For example, you could auto assign a schedule for all columns except Hall Lock-up. Then you could use the Single Column feature to fill in this remaining column (this scenario is ideal because conflicts would be acceptable). If used correctly, and /or in combination with the existing auto-assign facilities, you may find that you end up with a better allocation of personnel.
The dialogue is in two parts, both of which are described in detail below. The left hand side is used for managing all the assignments (actions) and the order in which they are assigned. The right hand side is used for altering the properties for any given action in the list.
Note: You must terminate the dialogue with OK for any changes to be saved! Also, the dialogue can't be closed with the OK button if you are in the middle of editing an action.
Action List
This is the action list and is the heart of the dialogue. It is important to understand how this feature works so that you can get the most of the options available to you.
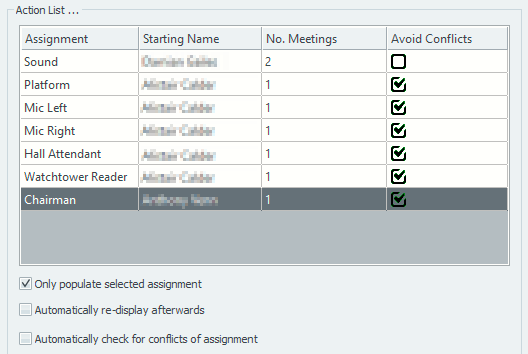
Each item in the list represents a column on your schedule. When you display this dialogue for the very first time, Meeting Schedule Assistant will automatically display all the columns that are in use on the current schedule. Thereafter, it will display details as set by yourself.
The normal Auto Assign feature works by populating each column left to right, and then each row top to bottom. However there are circumstances where a brother will want to nominate which column is auto-assigned first relative to the importance of the duty. For example: A congregation might have only a few elders, and these are assigned in the Booth and Attendant roles. The most important role in that congregation is the Attendant assignment. Therefore the person making up the roster will not want elders to be selected for Booth assignment first but for Attendant duty, and then later these can be allocated for duty in the Booth.
There are a number of things that you can keep in mind when setting the priority. Doing so will help you get the best allocation of personnel with relative simplicity:
- You should populate any columns that require the same name to be used for more than one meeting/week first. This is because it is impossible to avoid conflicts.
- Next, you should populate (in order or priority) all the columns where you need to avoid conflicts.
- Finally, you should populate the remaining columns that are allowed to have conflicts.
Only populate selected assignment
There are occasions when you might want to populate a single column (assignment). Hence the name for this feature! Highlight the assignment, alter the settings if required, and tick this setting. Meeting Schedule Assistant will only fill in this column and leave all the others as they are.
But why bother having this facility when you can fill in all columns at once? Several reasons come to mind:
- You already populated the other assignments using the existing Auto Assign functionality and now want to populate the remaining column using different settings.
- The schedule has been populated before and now you want to re-populate a single column, leaving the others unaffected.
- You are unsure of what starting names to use for each column and want to decided on a column by column basis as you populate the schedule.
These are just some possible reasons for using this setting.
Automatically re-display afterwards
Only populate selected assignment must be ticked for this setting to be available. This setting is really handy if you want to fill in each column manually. If it is ticked, Meeting Schedule Assistant will populate the selected column and then re-display the dialogue for you to select the next column to populate.
Automatically check for conflicts of assignment
If this option is ticked, Meeting Schedule Assistant will automatically identify any conflicts of assignment and highlight them for you in cyan. If requested to, the program tries to avoid conflicts. At times it is unavoidable because it occasionally runs out of personnel!
Add to List
Have you included a new assignment on your schedule? Is it not available in the action list? Then this is the button to click! When clicked, it creates a default action item (assignment) at the bottom of the list and selects it for editing. Now you must customize the action by making the required changes on the right hand side of the dialogue and click Apply Changes.
This button is disabled if you are in the middle of editing an action entry. In such a situation you must apply or cancel the changes you were making first.
Delete from List
Is there a column (assignment) in the action list that you don't want to populate? Select it in the list and press this button to remove it. It can be added again by using the Add to List button. This button is disabled if you are in the middle of editing an action entry.
Move Up / Move Down
Use these buttons to adjust position of each action (assignment) in the list. Think of the position in terms of importance. The assignments will be populated in the order they are presented in the action list. These buttons are disabled if you are in the middle of editing an action entry. Also, one or other will be disabled if your item is already at the top or bottom of the list.
You may ask: Can I not just nominate which column appears in which order in the editor anyway? [Assignments Editor: File > Export Settings > Table Properties > Column Order] Yes you can, but this is for the appearance of the schedule only, not for the Auto-Assignment 'brains' behind Meeting Schedule Assistant. The appearance of the columns in the editor are set according to how the program software is written; the user has no control over that section. [Home Screen: Options > Headings]. But now you do have more control over how the Auto-Assign feature works!
Settings
This part of the dialogue is used for changing the properties for the currently selected assignment (action in the list).
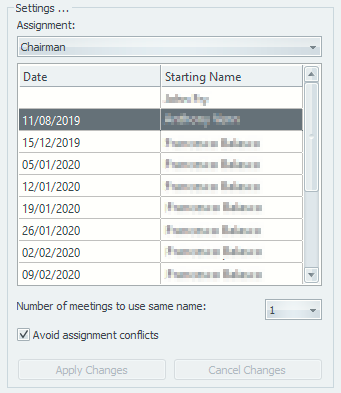
Please make good use of the Starting Name setting. This can't be overemphasized since it is your starting point for filling in each column on the schedule. By choosing sensible names for each column you are going to help achieve two objectives:
- You will help it avoid assignment conflicts (if applicable)
- You will help it stagger the allocation of personnel to the various assignments (for example, you should be able to avoid back to back assignments)
Assignment
The assignments presented in the drop list are in the same order as all the column headings that you have visible in the editor. Select the correct assignment (column) from those available.
Starting Name
This displays a list of all available personnel for the current assignment and automatically changes as you select different assignments. The list will also indicates the last time that each individual was assigned for this specific assignment. This information is obtained from the Duty Assignment History file.
Select the name that you would like to start populating the column with. The program will do it's very best to use your chosen name but it might use the next name in the list if your chosen one was not available for the first date on the schedule. Don't worry since this is handled automatically for you!
Number of meetings to use same name
There are certain assignments that may be allocated to personnel for a consecutive period of time. For example, you may allocate a sound servant for both meetings at a time. You can select from between 1 and 10 meetings
When Meeting Schedule Assistant is in Weekly mode then you are specifying the number of weeks (i.e. number of rows on the schedule to use the same name). Please understand that you can't avoid conflicts of assignment when you use a setting higher than 1.
Avoid assignment conflicts
Meeting Schedule Assistant will examine all names on the current row in the schedule before using a given name. If the name is already allocated in will try to use the next available name. It doesn't matter which columns have already been filled because it will look at all of them.
This option is only available when the number of meetings to use the same name setting has been set to 1.
Apply Changes
Saves the settings for the current action and updates the action list.
Cancel Changes
Cancels the changes you made and reverts back to how it was before you started editing.