
Speaker
The Speaker window lets you manage a public talk speaker's contact details, availability, and assigned talks.
The window is divided into three main sections:
- Details — Speaker information and notes.
- Availability — Dates when the speaker is available or unavailable.
- Assigned Talks — The speaker's assigned and favourite public talks.
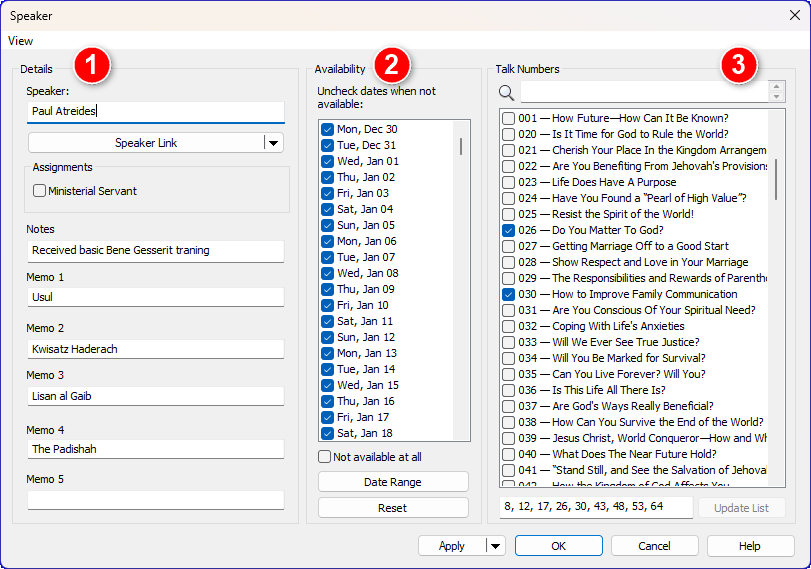
How to Access
You can open the Speaker window by either:
- Selecting Database → Congregations → Manage, then selecting a congregation and choosing a speaker to Add or Edit.
- In the Weekend Meeting Editor, clicking the menu (☰) button next to the Speaker dropdown, then selecting Manage, followed by Add or Edit.
Details
This section contains speaker information, including:
- Name
- Notes
- Memo 1–5
💡 Tip: Memo labels can be customised using Options → Labels.
Ministerial Servant
Enable Ministerial Servant if the brother serves in this appointed capacity. In the Weekend Meeting Editor, the speaker’s name appears in dropdown lists using the chosen text colour.
See also: Options
Availability
You can record a speaker’s availability throughout the year. This is especially useful for managing your own congregation’s speakers when they are temporarily unavailable due to:
- Holidays
- Sickness
- Temporary inactivity
In the Weekend Meeting Editor, unavailable speakers are shown in the speaker dropdown lists using the chosen text colour.
💡 Tip: The Not Available colour overrides the Ministerial Servant colour.
Not Available at All
Select Not available at all to mark the speaker unavailable until you manually clear the setting.
Date Range
Use Date Range to set availability over a range of dates. Choose a start and end date and specify whether the speaker is available or unavailable.
Reset
Click Reset to mark all dates as available.
Assigned Talks
Check each public talk assigned to the speaker.
- Checked — assigned public talk
- Intermediate — favourite public talk
- Unchecked — not assigned
Jump To
Use Jump To to quickly locate talks. As you type, the list highlights the first match. Use the spinner buttons to move to the next or previous match.
Update List
You can type talk numbers directly into the text box or paste a comma‑separated list.

Figure 41. Updating the speaker’s assigned and favourite talk numbers.
Syntax Rules
- Separate talk numbers with commas
- Any order is allowed
- Mark favourites with an asterisk (e.g., 1, 5, *10, 50)
- Spaces are optional
Updating the List
Click Update List to synchronise the talk list after editing the text.
Validation
The program checks all numbers for validity. Invalid entries (for example, 1,,5 or 1, xyz) trigger an error message.
Window Actions
Use the buttons at the bottom of the window to manage your changes:
- Apply — Saves updates to the database without closing the window.
- Apply & Add — Saves updates and opens a new blank speaker record for immediate entry.
- OK — Saves updates and closes the window.
- Cancel — Reverts all unsaved edits since the last save and closes the window.
Supporting Tools
View Menu — Report Viewer
You can open the Report Viewer from the View menu on this window. The Report Viewer lets you generate, preview, print, and export reports.
See also: Report Viewer
Related Topics
Navigation
- Parent topic: Congregation Manager
- Next topic: Hyperlinks