Weekend Meeting Editor
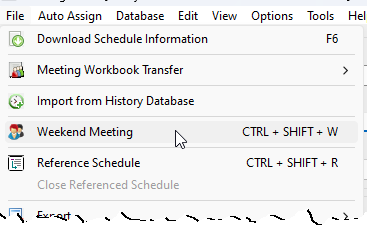
The Weekend Meeting window is available from the File menu.
Or you can press CTRL + SHIFT + W
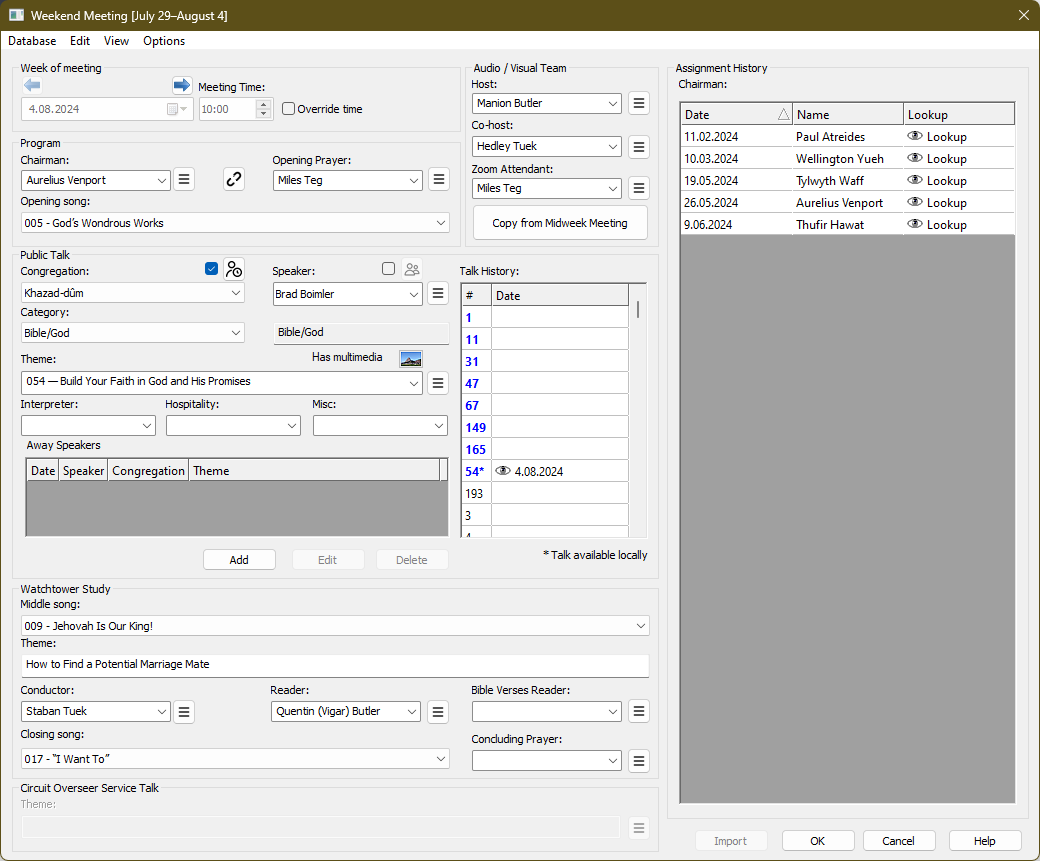
Use the Weekend Meeting window to detail the information you would like to display on the schedule. Populate the various boxes by selecting from the dropdown lists or manually typing in the details.
 Learn more about the Weekend Meeting window by looking through the rest of this help topic. Or, as an alternative, click on the option you are interested in on the screenshot above.
Week of meeting
Use the left/right arrows to quickly move from one meeting to the next.

This has been provided for those of you who only need to manage the Weekend Meeting assignments.
Meeting Date and Time
The Meeting Date is determined automatically from the Congregation Database. This is also true for the Meeting Time. The time will be adjusted automatically to take into account any Time Changes that you have set up.

There are a few circumstances (for example, the visit of the Circuit Overseer) that may require a change in meeting time. Use the Override time option to cater for this.
Assignments
At the very least you should use the dropdown lists to specify the Chairman.
The other assignments are optional.
Use to hamburger icon to move / swap assignments as necessary.
The Hospitality and Miscellaneous dropdown lists are dynamic. When you enter a new name and close the dialogue by clicking OK, that name will be added to the dropdown list for future use. Similarly, if you hover over a name in the dropdown list and press DEL, it will be permanently removed — just make sure to close the dialogue by clicking OK to save the changes. The remaining assignments are managed through the Publishers Database.
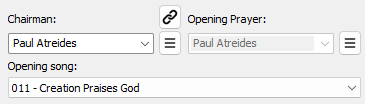
Linking Chairman and Opening Prayer
You can link both the Chairman and Opening Prayer assignments together. Click the button to toggle the link on or off.
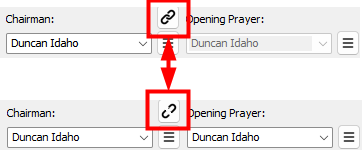
The Opening Prayer assignment will automatically stay in sync as you select a name from the Chairman dropdown list or key-in a new name.
The link setting is remembered and becomes the default for scheduling future weeks.
You will need to temporarily deactivate the link if you need to use the Swapping Assignments tool with the Opening Prayer assignment.
Confirmed Status
Uncheck this option if you have not yet confirmed the home talk assignment.

Unconfirmed assignments can be highlighted in a separate text colour on some of the reports that can be generated. Set this option once you have confirmed the assignment details.
To set the default Confirmed Status for new schedules, go to the Database Options window.
Symposium
The Body of Elders decides whether it is beneficial for an inexperienced public speaker to deliver the first 15 minutes of a talk, followed by a more experienced speaker for the remaining 15 minutes.

- Check the box to activate the Symposium feature.
- Click the Symposium button to open a small popup window where you can select the second speaker.

- Hover over the Symposium button to view both speakers in a tooltip.

- Uncheck the box to deactivate the Symposium feature.
Did you know that you can assign the selected talk to both speakers? See below to learn how.
Did you know that you can automatically select either speaker to conclude the meeting in prayer? See below to learn how.
Speaker Notes and Images
Press this button to display the Notes and Images pop-up window. Use this window to provide details about the required notes and images for the public talk.
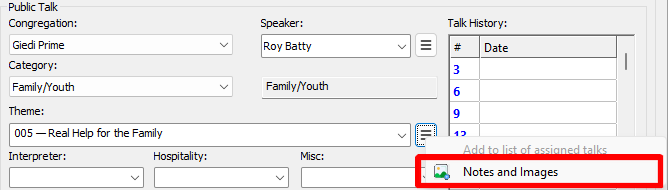
Some talks have a Has multimedia label displayed, which is set by the Organization.

The speaker notes and images are included on the default Worksheet S-140 Weekend Meeting template. Find out more about the Weekend Worksheet template and how you can customize the look and feel to meet your needs.
Talk History
This is a list of all the available talk numbers and the date they were last heard, or if appropriate, the latest date they are next scheduled for.

The default sort order is ascending date order. This means the talks which have not been heard for the longest amount of time are listed first. You can sort with either column by clicking on the headings.
As you select a speaker to give the home talk, his favourite and assigned talk numbers get highlighted in this list. His talks are grouped together and listed first to make it easier to see which of his talks can be heard next.
- Click on a talk number in the list and it will be automatically selected as the chosen home talk for the given date.
- Click on the lookup symbol it you want to see how has given this talk in your kingdom all and when.
Lookup History
The information is displayed in a popup window in descending date order.

It displays:
- The date of the talk
- The speaker who was assigned
- The congregation he was from.
The talk history list is a very powerful feature of the program. If used correctly, you can easily determine which talk number you would like the speaker to give.
Please also keep in mind that the needs of the congregation / neighbourhood should be of primary concern when selecting outlines. But using this feature can help you avoid the speaker giving the same talk twice in a row.
Add to list of assigned talks
Click on the hamburger symbol to display this context menu.

If the talk number is not yet included in the speakers’ list of assigned talks, the menu item Add to list of assigned talks will be available. You will be asked to confirm whether you want to add the talk number to the selected speaker. If you answer Yes, it will automatically add this talk number to their list of talks. This saves you from having to go through the Congregations Database menu navigation to do it.
The context menu appears slightly different when the public talk is given as a symposium. This allows you to assign the selected talk to either speaker, if needed:

Manage
This menu is displayed when you click the Manage button:

Here is a brief review of the available actions:
- Add: add a new public talk speaker to the congregations database
- Edit: edit an existing public talk speaker in the congregations database
- Delete: delete an existing public talk speaker from the congregations database
- Change Congregation: move the selected speaker from one congregation to another in the database
Use these shortcuts to avoid navigating the Congregations Database menu.
Exchange Notes

Shows a popup window for you to type in a note about this talk exchange. Some examples:
- Email reminder sent (20/03/2024)
- Confirmed with [Talk Coordinator] (10/07/23)
- Request sent (26/04/24)
Away Speakers
This is a list of away talks that have been assigned during the same week as the currently displayed home talk.
Add
Press this button to add a new away talk assignment to the schedule. The Away Talks window is displayed for you to enter the new details. Click on the link for more details.
Edit
Press this button to edit an existing away talk assignment. You must select an away talk before you press the button.
The Away Talks window is displayed for you to adjust the details as required. Click on the link for more details.
Delete
Press this button to delete the selected away talk assignment from the schedule.
You must select the talk that you want to delete before pressing the button.
Watchtower Study
Use the dropdown lists to specify the Watchtower Conductor, Reader and Bible Verses Reader.
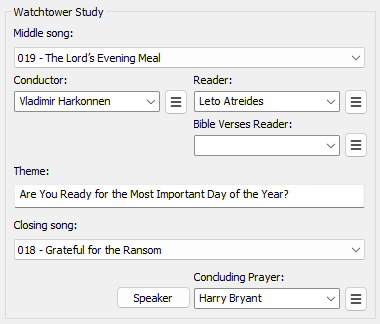
Use the edit box to specify the theme for the current Watchtower Study.
Use the other two dropdown lists to select the assigned song numbers.
The Watchtower theme is automatically provided for all languages that support monthly volunteer data.
Concluding Prayer
Press the Speaker button to automatically copy the Speaker over to the Concluding Prayer assignment.
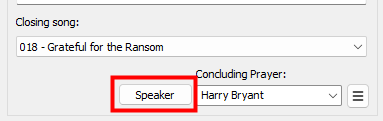
The context menu appears slightly different when the public talk is given as a symposium. This allows you to select either speaker to conclude in prayer:

Circuit Overseer Service Talk
Use the edit box to specify the concluding Service Talk theme to be given by your Circuit Overseer.

Press the Notes and Images button to display the Notes and Images pop-up window. Use this window to provide details about the required notes and images for the Circuit Overseer's service talk.
These controls are only enabled when the Circuit Overseer Service Talk option is selected in the editor.
Video Conferencing
Use these dropdown lists to specify who will be the Host, Co-host and Zoom Attendant for your hybrid meetings.

Pressing Copy from Midweek Meeting will transfer the Host Co-host and Zoom Attendant from the Midweek Meeting.
Assignment History
The Assignment History feature provides a quick overview of past / upcoming assignments, helping you make informed decisions. Click on an assignment to view its history and easily reuse previous entries. For more details on how to use this feature, visit the related topic Using the Assignment History Panel.

Database Menu — Congregations
From here you can add / edit / delete congregations and their associated speakers. This database is used when assigning Public Talks.
Database Menu — Publishers
Do you need to make some changes to the Publishers Database? This is now possible from inside the Weekend Meeting Editor. The editor will automatically update all the various dropdown lists when you close the Publisher Database window.
Edit Menu — Duty Assignments
Do you include information from the Assignments Editor on your schedules by using the Duty Assignment History ? Now it is possible to make changes to those assignments by using the Edit Duty Assignments tool. Click Duty Assignments on the Edit menu.
View Menu —Report Viewer
You can open the Report Viewer from the View menu on this window. The Report Viewer lets you generate, preview, print, and export reports.
See also: Report Viewer
Options Menu — Labels
This displays the same popup window to let you customize some of the assignment labels. Find out more by clicking this link.
Both the Meeting Editor and Weekend Meeting Editor use the same set of custom label text.
Import
This window contains a special and unique feature. If you handle public talk coordination and you have the Public Talks program installed (see www.publictalksoftware.co.uk) you can populate the window directly with information extracted from that software using the Import button. These two programs are designed to work together. Using the database is a time saver because you don't have to manually type in the information and you are less likely to make errors (unless they were already wrong in the database!). Once the button is clicked, you will see this window:

The correct assignments will be selected automatically. The database information is presented using the following format:
Date - Brother (Congregation)
The Import button is disabled if the date of the meeting is in the past.
OK
Closes the dialogue and the schedule preview is automatically updated to reflect your changes.
Cancel
Closes the dialogue and aborts all changes made to the schedule.
Help
Displays this help topic.
Lookup
Clicking on the Lookup symbol will display a list of the most recent dates that the selected publisher has handled this assignment (in descending date order).
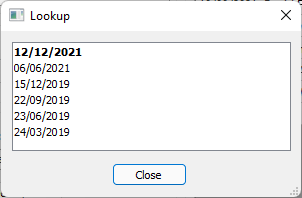
In addition, it will display all upcoming assignments for the publisher in bold text. This includes those future assignments on the current schedule, and any held in the assignment history file.
Future assignments are included as this can be useful if you need to make changes to existing student arrangements.