Exporting S-89 Data
Overview
Would you like a way to use the official S-89 Assignment Slip PDF template files that are available in the JW.ORG login area? This can be achieved by exporting the S-89 Data to a text file and then using third-party software to automatically prepare the PDF assignment slips in bulk.
 This tutorial uses software called PDF-XChange Editor. The free version can be used but it might add a watermark to all generated PDF files. The commercial version is reasonably priced and won't create any watermarks. Feel free to get in touch and suggest other third-party alternatives that you know of. But PDF-XChange Editor has a good set of features for creating the S-89 Assignment Slips in bulk.
Exporting
Follow these steps to export the S-89 Data:
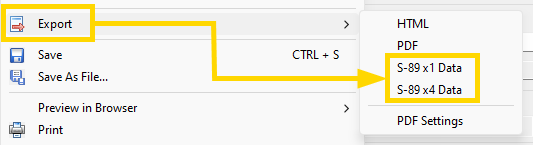
- Select Export on the File menu (or Context Menu).
- Select either S-89 x1|x4 Data from sub menu.
- Choose the type of export you want to create from the dropdown list.
- Specify the file name and choose where to save it.
- Click Save.
Export Modes
There are four different export modes:
- S-89 x1 11-2020 Data — Use this mode with the single 11/20 PDF template.
- S-89 x1 11-2023 Data — Use this mode with the single 11/23 PDF template.
- S-89 x4 11-2020 Data — Use this mode with the multi 11/20 PDF template.
- S-89 x4 11-2023 Data — Use this mode with the multi 11/23 PDF template.
Which Slips Get Exported?The Meeting Editor will export all of the assignment slips that are visible in the preview area. The following settings affect which assignment slips are displayed:
|
Creating the S-89 Assignment Slips
Start PDF-XChange Editor and click Populate Forms. This can be found on the Form ribbon panel:

The software has an online help topic that explains how to use the Populate Forms window. But this help topic also highlights several key features:

Step 1
Click the button to select your S-89 PDF template file.
Step 2
Select the semi-colon ( ; ) delimiter from the dropdown list.
Please make sure that you select the right delimiter before you proceed to step 3.
Step 3
Click the button to select the S-89 Data text file that you exported from the Meeting Editor.
Step 4
Step 4 is optional. You can use the checkboxes on the left-hand side to fine-tune which S-89 Assignment Slips get created. Or, you can use the edit box just above. In-fact, that edit box is automatically updated as you check / uncheck individual rows.

All rows are checked by default. Only untick if required.
Step 5
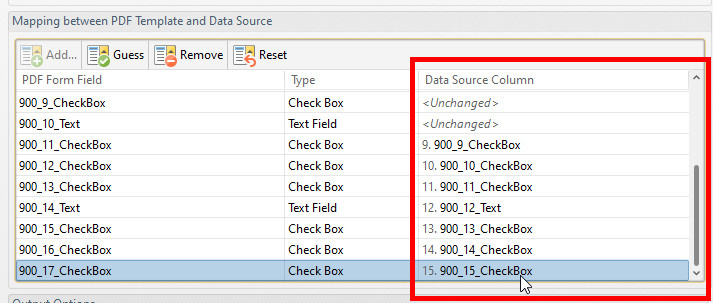
Step 5 is where you can setup the mapping between the S-89 PDF Template and the S-89 Data. It is automatically setup correctly for the S-89 11/20 or S-89 11/23 assignment slip templates.
But, you will need to make some adjustments to the mapping if you are using one of the older S-89 Assignment Slips. See the Field Mappings section below.
Take for example Haitian Creole, which uses the S-89 10/19 Assignment Slip template. Changes will have to be made to the field mapping:
CounselText Field
The S-89 Data text file does include a custom field called CounselText1|2|3|4. For example:
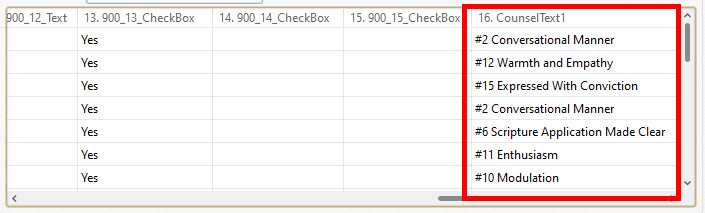
This field includes the counsel text for the student item (as formatted in the Assignment Slip Settings window in the Meeting Editor).
The internal S-89 Assignment Slip Templates that the Meeting Editor uses are designed to show the counsel text. But the latest S-89 PDF templates from the JW.ORG login do not have a dedicated field. You could customize the official PDF template if you wanted to, but that is beyond the scope of the help topic.
Step 6
Click the button to specify the folder that you want to use for the created S-89 assignment slips.
Step 7
You can customize what the output assignment slip PDF filenames will be by using Macros. The easiest thing to do is click on the dropdown arrow and select Row Data By Column ... (at the top of the menu). This will display a small window for you to select one of the fields in the S-89 Data to use as part of the filename. Also, you can have more than one of these fields as part of the filename.
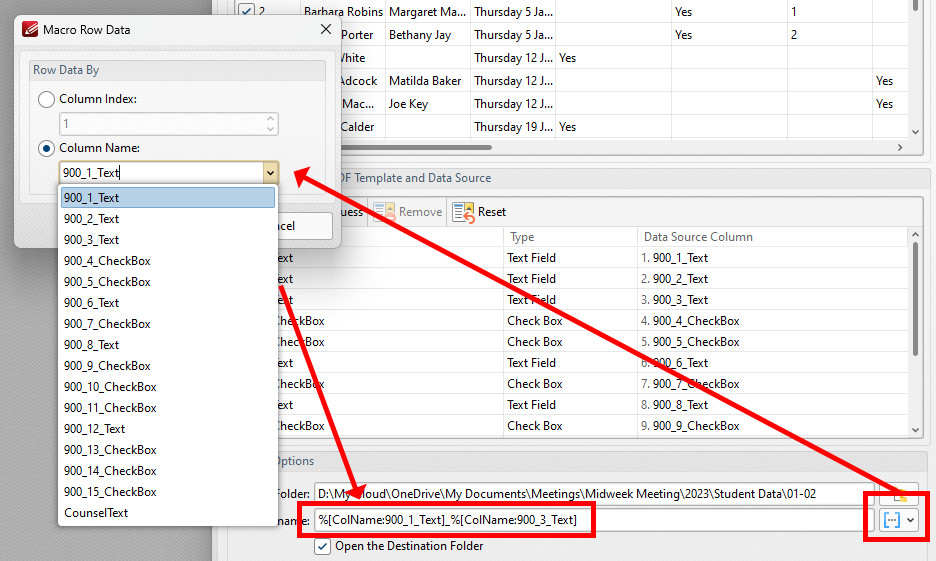
Remember that the field 900_3_Text represents the Date of the student item. So, if you want it to be part of the file name, you need to ensure you have formatted it accordingly in the Assignment Slip Settings window of the Meeting Editor.
Step 8
It is suggested that you click the Options button and set the option to Flatten all form fields in the output PDF documents. This will ensure that the assignments slips can't be tampered with.
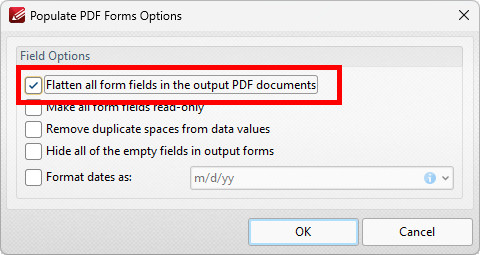
Click the OK button and the software will create all of your assignment slips for you.
Field Mappings
The student data is exported using the S-89 11/20 assignment slip field names (the latest official slip). This field mapping table has been provided if you are using one of the older S-89 assignment slip PDF template files.
|
Field Description |
S-89 11/23 Fields |
S-89 11/20 Fields |
S-89 10/19 Fields |
S-89 10/18 Field |
S-89 10/17 Fields |
|
Name |
900_1_Text_SanSerif |
900_1_Text |
900_1_Text |
Name |
Name0 |
|
Assistant |
900_2_Text_SanSerif |
900_2_Text |
900_2_Text |
Assistant |
Assistant0 |
|
Date |
900_3_Text_SanSerif |
900_3_Text |
900_3_Text |
Date |
Date0 |
|
No. Part |
900_4_Text_SanSerif |
- |
- |
- |
- |
|
Counsel Point |
- |
- |
- |
- |
CounselPoint0 |
|
Bible Reading |
- |
900_4_CheckBox |
900_4_CheckBox |
Check Box01 |
bibleReading0 |
|
Initial Call |
- |
900_5_CheckBox |
900_5_CheckBox |
Check Box02 |
initialCall0 |
|
Initial Call Text |
- |
900_6_Text |
900_6_Text |
- |
- |
|
Return Visit (or 1st RV) |
- |
900_7_CheckBox |
900_7_CheckBox |
Check Box03 |
firstRV0 |
|
Return Visit Text (or 1st RV Text) |
- |
900_8_Text |
900_8_Text |
- |
- |
|
2nd Return Visit |
- |
- |
900_9_CheckBox |
Check Box04 |
secondRV0 |
|
2nd Return Visit Text |
- |
- |
900_10_Text |
- |
- |
|
Bible Study |
- |
900_9_CheckBox |
900_11_CheckBox |
Check Box05 |
bibleStudy0 |
|
Talk |
- |
900_10_CheckBox |
900_12_CheckBox |
Check Box06 |
talk0 |
|
Other |
- |
900_11_CheckBox |
900_13_CheckBox |
Check Box07 |
other0 |
|
Other Text |
- |
900_12_Text |
900_14_Text |
Other |
otherText0 |
|
Main Hall |
900_5_CheckBox |
900_13_CheckBox |
900_15_CheckBox |
Check Box08 |
mainHall0 |
|
Auxiliary Classroom 1 |
900_6_CheckBox |
900_14_CheckBox |
900_16_CheckBox |
Check Box09 |
auxiliaryCR1_0 |
|
Auxiliary Classroom 2 |
900_7_CheckBox |
900_15_CheckBox |
900_17_CheckBox |
Check Box10 |
auxiliaryCR2_0 |
|
Supported Languages |
All remaining languages (not mentioned for the other 4 types of S-89 Assignment slips). |
|
|
|
|
Multi-Slip Field Names
For the multi 11/20 PDF template the field names are similar.
- Fields 1 to 15 are for the top left slip.
- Fields 16 to 30 are for the top right slip.
- Fields 31 to 45 are for the bottom left slip.
- Fields 46 to 60 are for the bottom right slip.
For the multi 11/23 PDF template the field names are similar.
- Fields 1 to 7 are for the top left slip.
- Fields 8 to 14 are for the top right slip.
- Fields 15 to 21 are for the bottom left slip.
- Fields 22 to 28 are for the bottom right slip.
Video Tutorial
Please watch this short video tutorial (no audio) to see how easy it is to export the S-89 Data and create all of your PDF assignment slips: