Context Menu
Overview of the Assignments Editor Context Menu:
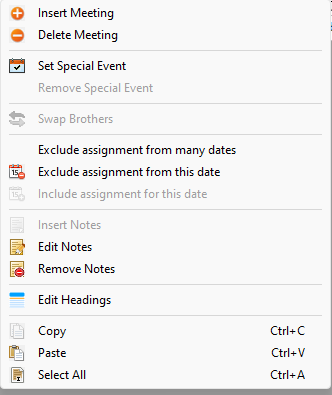
There are a few extra features available to you in the editor when you right-click the grid. It displays this context menu.
 Learn more about the Context Menu by looking through the rest of this help topic. Or, as an alternative, click on the menu item you are interested in on the screenshot above.
Let’s explore its essential features:
Insert Meeting
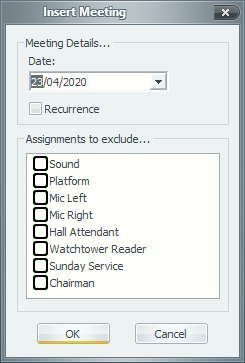
Sometimes you might need to add a new meeting into the schedule. For example, if you have the circuit overseer visit it will most likely mean that you will have an extra meeting at the Kingdom Hall. In order to allow for this flexibility, you can right-click anywhere in the report grid to see this pop-up menu. Clicking Insert Meeting will then show this small dialogue:
|
Recurrence Set this option if you want to repeat this data every week on the current schedule. Assignments to exclude Tick any assignments that you would like excluded for the dates added to the schedule. When an assignment is excluded, it means the editor will not present you with a dropdown list. Here is a scenario where you might use these extra features: Suppose you want to insert all the Saturday dates into the current schedule. Then simply choose the first Saturday date and then use the Recurrence setting. However, since this is a Saturday, only one of the assignments is valid. In this scenario, Weekend Ministry is a custom assignment and is the only valid assignment for a Saturday. So tick all but this assignment to exclude them from each row. |
It is important to understand that the brothers listed for these meetings are the brothers available for the Midweek Meeting.
Delete Meeting
Select this to delete any meeting from the grid. You can delete special events or meetings that you had inserted as well. Since the change is permanent you are asked to confirm your actions.
Set Special Event
Remove Special Event
There are occasions when you might want to change the way the report looks and indicate a special event. Such events could include the Special Assembly Day, District Convention or Circuit Assembly. In order to do this, you must right-click the row in the schedule for which you want to assign this event. Then select the Set Special Event menu item to display a small pop-up dialogue:
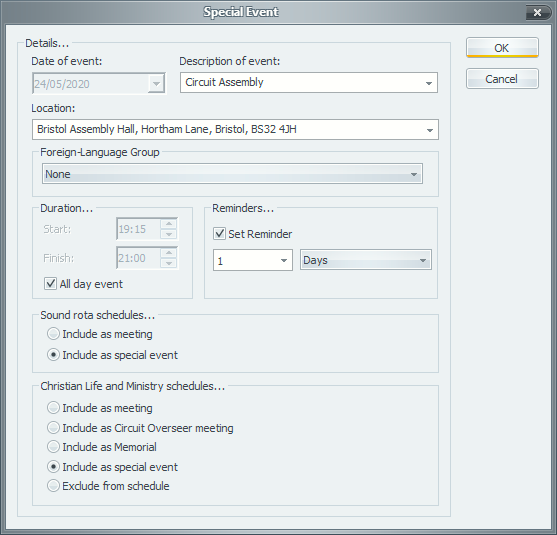
Using this dialogue you can choose one of the pre-defined events or type one of your own. When a row is converted into a special event, the cells get merged together so it all looks nice and tidy (see below). You can change the special event text again by double-clicking the cell.

Of course, you can undo this change to the report by right-clicking again and selecting Remove Special Event, in which case it reverts back to the individual cells with dropdown lists. All rows specified as events will be ignored during the automatic assignment process, so it makes sense to define these before you do automatic assigning. These events are also saved when you save the report.
If you would like further options as to how these events are displayed in the reports, then consider exporting the report to HTML by the Export button. By using the Export Settings, you can alter the font that is used for the events.
You can use the Events Manager to automatically show special events on all new reports. However, when you set a special event from within the report itself, it will get added to the special events list. Also, there are times when you might want this event excluded from a service meeting schedule, in which case you should set the Exclude from Service Meeting schedule option.
Swap Brothers
Sometimes you might want to swap two brothers assignments. For example, Auto Assign might always end up place the same brothers in the same columns. This is a quick way to swap the two brothers. Right-click anywhere on the schedule for this pop-up menu to display.
Before you can swap two brothers, you must select them. This is done by clicking the left mouse button whilst holding down the CTRL key (lower left of keyboard). A selected brother will be highlighted. To deselect a brother, simply CTRL + left mouse click again.

Note that you can only select two brothers, although they do not have to be side by side. Once you have selected the two brothers, the Swap Brothers menu item will be available.
The two brothers must be available on the relevant meeting days for the swap to be successful. If one or the other can be swapped, the operation will fail and you will be informed.
Certain actions, like Show Conflicts will automatically deselect any highlighted cells.
Exclude assignment from many dates
Occasionally there are times when you want an extra assignment (column) added but you do not want it to be populated each week/meeting (row). This feature selected from the right click menu Exclude assignment from many dates caters for this matter by excluding the assignment from as few or as many weeks/meetings as necessary.
To illustrate: lets say you have a C.O visit followed by a host visit for an assembly and a memorial in the same period covered by the report schedule; as a consequence you want to add a feature assignment Other to cater for an additional translator at the meeting; or an extra attendant; or any other role. You create the assignment in the options dialogue and have it available for all meetings > assign names to the assignment in the publishers database > then when you create a report, right click and using the standard CTRL+ click method, exclude the assignment from weeks you do not need it before you populate the remainder of the grid.
Exclude assignment from this date
Occasionally an assignment might not be required on the schedule and you wish for it to remain blank while not upsetting the sequence order of brothers selected for other cells. For example: no reader for the Watchtower is required during a Circuit Visit; no roving microphone handlers are required during the Memorial celebration.
When you (right click) exclude an assignment for a given date, you will be presented with a pop-up message box to confirm your actions. When Yes is applied, the specific cell on the schedule will change into an empty or blank one and become read-only; this means that when you engage the Auto Assign feature, it will bypass populating this cell with a name.
You can, should you change your mind, re-instate the dropdown list nature of an excluded cell.
Include assignment for this date
To revert any given blank or read-only cell back into a dropdown list type of cell again, select Include from the (right click) menu list. This action can only be performed for cells where you had previously selected Exclude assignment from this date.
You cannot modify or adjust any cells that have become excluded via the program Options dialogue.
Schedule Notes
|
|
|
Select Edit Notes modify the current notes. This displays this window:
The set of notes can be as long as you like because they will word wrap on the schedule. Double-clicking the existing notes will also display this dialogue. If you want to keep the changes you have made permanent, so that if will be used the next time a schedule is created, then click Set Default. When exporting the schedule to HTML you can use the export settings to customise the basic font characteristics for the notes. |

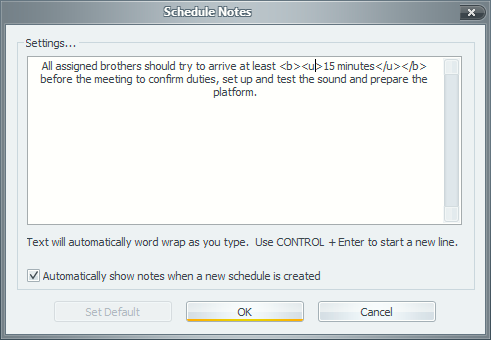
Tip! You can consider including some HTML syntax in the notes. For example, the text <b><u>some text</u></b> will cause the text to show bold and underlined. So this is a very powerful way to make certain parts of the notes stand out.
Edit Headings
Do you need to make a change to the report title or the column headings? Then use this pop-up menu item. All the current headings are presented to you in a dialogue and you can alter them accordingly. The changes you make to the headings are applied to the current schedule only. Click here for important information about the report title.
Clipboard
The Assignment Editor has full clipboard support. You can select any range of cells and copy/paste to/from the clipboard.
It is your responsibility to ensure the data you are pasting into the Assignments Editor is valid.