File Menu
Overview of the Assignments Editor File Menu:

 Learn more about the File Menu by looking through the rest of this help topic. Or, as an alternative, click on the menu item you are interested in on the screenshot above.
Let’s explore its essential features:
Save
Save As File...
Once you have populated your schedule with assignments you can save it. Select this menu item to do this. It will display a dialogue for you to choose a name and location for the saved report. Saved reports use the .SRR file type. These files store all of the settings that are in place when the schedule was created. They can also be opened up again later on and modified etc..
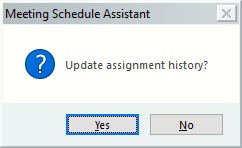
During the save process you will prompted with up to three questions. This is the first:

If appropriate you should select Yes to update the Duty Assignment History file. This information is useful when beginning the automatic assignment process. In addition, this history information can be included on the schedules created with the Meeting Editor.
The second and third prompts relate to updating your Google and Outlook calendars.
Once you have saved a schedule, it's file-name is displayed in the top left-hand corner of the dialogue.
 Save As File will always show a file dialogue whereas Save will only show one when saving a brand new schedule for the very first time.
Import
This allows you to automatically fill-in selected assignments on your schedule from the Assignment Editor/ Meeting Editor history database, or external CSV data file. Displays the Import window to let you customise the import process.
Export
The schedule can also be exported into HTML (see here for more info) and Comma Separated Values (CSV) formats. A HTML file can be opened directly in Microsoft Word for editing. This is very useful if you want to add some additional details like notes. The file dialogue displayed has a Settings button where you can alter how the report will look in the HTML file. The settings dialogue allows you to print the HTML schedule too. Note that these settings also affect how Print Preview operates and it can also be displayed directly by selecting Export Settings from the menu.
CSV format is a simple text output. Each text value is wrapped in quotes and delimited with a comma. Such a file can be opened using Microsoft Excel or used with Microsoft Word during mail merge. The Settings button (on the file dialogue) becomes disabled when you select this export file format.
Note that export to CSV is not available when in Duty Slip mode and the setting dialogue will be different when in this mode (see below).
Preview in Browser
This will display a list of installed Internet Browsers. At the moment the following are supported:
- Firefox
- Google Chrome
- Internet Explorer
- Microsoft Edge
- Opera
This feature has been primary provided for those of you who use Ultra HD (also known as 4K) monitors. The internal print preview mechanism does not work properly for these systems. But printing works correctly with the latest browsers.
 The editor will convert the schedule to a temporary HTML file before it is displayed in the browser. This is because some browsers can't use the underlying XML/XSL system. This temporary file will be automatically deleted for you.
Please also be aware that each browser might handle the page break syntax differently. So you might have to make a customized XSL to work with your specific browser. Please contact me if you need help.
Displays the Print window with a preview. Find out more about printing in the Printing Schedules (Meeting Editor) help topic.
 Printing can only be done when the the Preview Tab active.
